

Three easy DIY halloween decorations
This spooky decoration will make the Halloween season spooktacular.
With the Halloween season approaching fast, there are several tasks that a person celebrating this holiday must accomplish before enjoying the “spooktacular” event. One of those tasks is making sure your house looks the most frightening out of all the houses in the neighborhood. Below are some easy, cheap DIY decorations that will add a bit more character to your house.
It’s expected that Americans will spend up to $6.9 billion this year buying candy, costumes, and decorations for Halloween. An easy way to cut back on how much money you spend this Halloween season would be to make your own decorations. Here are some inexpensive ways to make decorations that will be sure to make your house look the most frightening out of all the houses in the neighborhood.
1) Glow in the Dark Spray Painted Pumpkins
Painting and carving pumpkins can become boring and especially messy. This craft is an easy way to make pumpkins that stand out without having to go through the grueling task of gutting a pumpkin.
Materials Needed:
- Pumpkin
- Glow in the dark spray paint (can be found at most department stores)
- Pumpkin design on label paper
When painting your pumpkin, make sure it is clean and dry. When the glow in the dark spray paint is done and dry, make sure you set it in direct light to guarantee the glow sets.
After you have your pumpkin design picked out, stick it to your pumpkin and apply the spray paint. Depending how many coats you layer on the pumpkin, it can change how bright the glow of the pumpkin would be. After the paint is dry, peel off the paper pumpkin design and there’s your pumpkin!
(Idea from Debbie Chapman, “Glow in the Dark Pumpkins”, One Little Project, 2014)
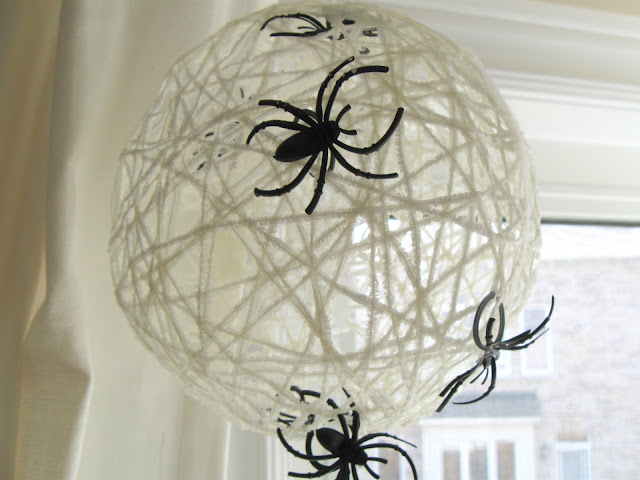
2) Dangling Spider Webs-
Now, it’s not Halloween without some sort of spider themed item! This cute spider web balloon isn’t super spooky, but it does have a bit of class. This activity is a kid-friendly DIY, but kids should always be under adult supervision.
Materials Needed:
- Yarn
- 2 Balloons
- Water
- Glue
- Invisible Thread(optional)
First, take a piece of yarn and put it in the glue. Be sure to mix water into the glue beforehand and apply a thin layer so it is not super thick on the yarn.
Next, blow up the balloon as big as the “web” ball that is desired. Don’t be super concerned about what the balloon looks like because you will pop the balloon after you are done putting the “webs” on.
Now it’s time to start putting the yarn dipped in glue on the balloon. It doesn’t matter what amount of yarn you add, but it looks best whenever a decent amount is added.
Once the yarn is dry, pop the balloon, and your spider web ball is done! Now add some plastic spiders to make it look more interesting and spooky! To hang the spider web ball, use invisible thread and tie a loop so that it can hang it from any place.
(Idea from Lucy Akins, “Crafts for Kids”, PBS)
3) Candy Corn Banner
It isn’t Halloween without candy corn! Below is an easy way to add a bit of color into some decorations, while still being fairly simple to make. This is a cheap DIY that the whole family could enjoy making.
Materials Needed:
- Paint Brush
- Whatever paint color you want to make the candy corn
- Ribbon/String (whatever you want your banner to be held together with)
- Paper Plates
When you go to paint the plates, make sure the plate does not have gloss on it so the paint sticks well to the plate.
Take the plates that have been laid out and make sure that they are flipped over so that the bottom of the plate is facing towards you.
Start with color that will be the tip of the candy corn, then paint a small circle in the middle of the plate. After the coloring is done, move on to the next color that will make a ring around the circle in the middle. When that is done, use the last color and paint whatever else is blank on the back of the plate.
After all of that dries, cut the plate into the candy corn shapes, and decide how big or small you want them. An easy way you can cut these would be to cut the plate into quarters, and then cut those in half.
Now all that has to be done is take each of the candy corns and make a hole in the end and thread a string through it and now the perfect candy corn garland has been made.
(Idea from Michelle, “Paper Plate Candy Corn Banner”, Gracious Wife, 2016)